



Krea AI offers a range of AI-powered tools for creating images, videos, and other visual content. For users who choose a paid plan, a Krea AI virtual card can be an alternative payment method for the subscription.
A virtual card can be useful if you want to keep an online subscription separate from your primary payment card. The exact checkout experience may vary depending on the card and payment provider.
This guide explains how to pay for Krea AI with a virtual card, from choosing a plan and entering your card details to completing the payment. It also covers a few things to check if the payment is declined or when the subscription comes up for renewal.
Before Paying for Krea AI
Before opening the checkout page, check the Krea plan you want and the price currently shown in your account. Krea offers free and paid plans, and its plan structure and pricing can change over time.
Krea uses Stripe to process payments for its paid services. The checkout page will show the payment fields and billing information required for your transaction.
Also check whether you are choosing a monthly or annual subscription. If you select a recurring plan, the payment method may be charged again when the next billing period begins.
If you are paying with a virtual card, check its available balance and expiration date before starting the checkout. If the card has restrictions on recurring payments or certain types of merchants, make sure those restrictions will not interfere with the subscription.
Pay for Krea AI With a Virtual Card
Step 1: Prepare Your Virtual Card
Have your virtual card ready before you begin the Krea AI checkout. If you already have a virtual card, check the card number, expiration date, CVV, and available balance. You can use an existing card as long as it meets the payment requirements for the transaction. If you haven’t created a Buvei virtual card, please follow these steps.
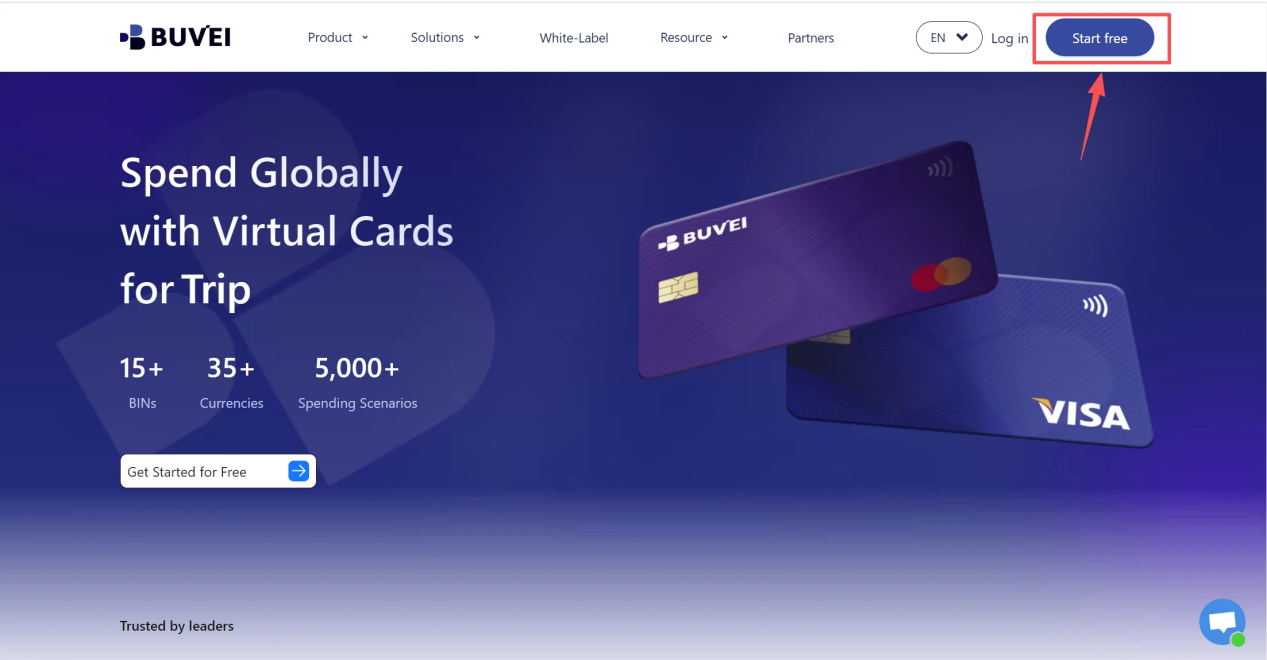
1.Sign up/Sign in at buvei.com
- If you haven’t signed up yet, simply click 'Start Free' to register quickly with your email.
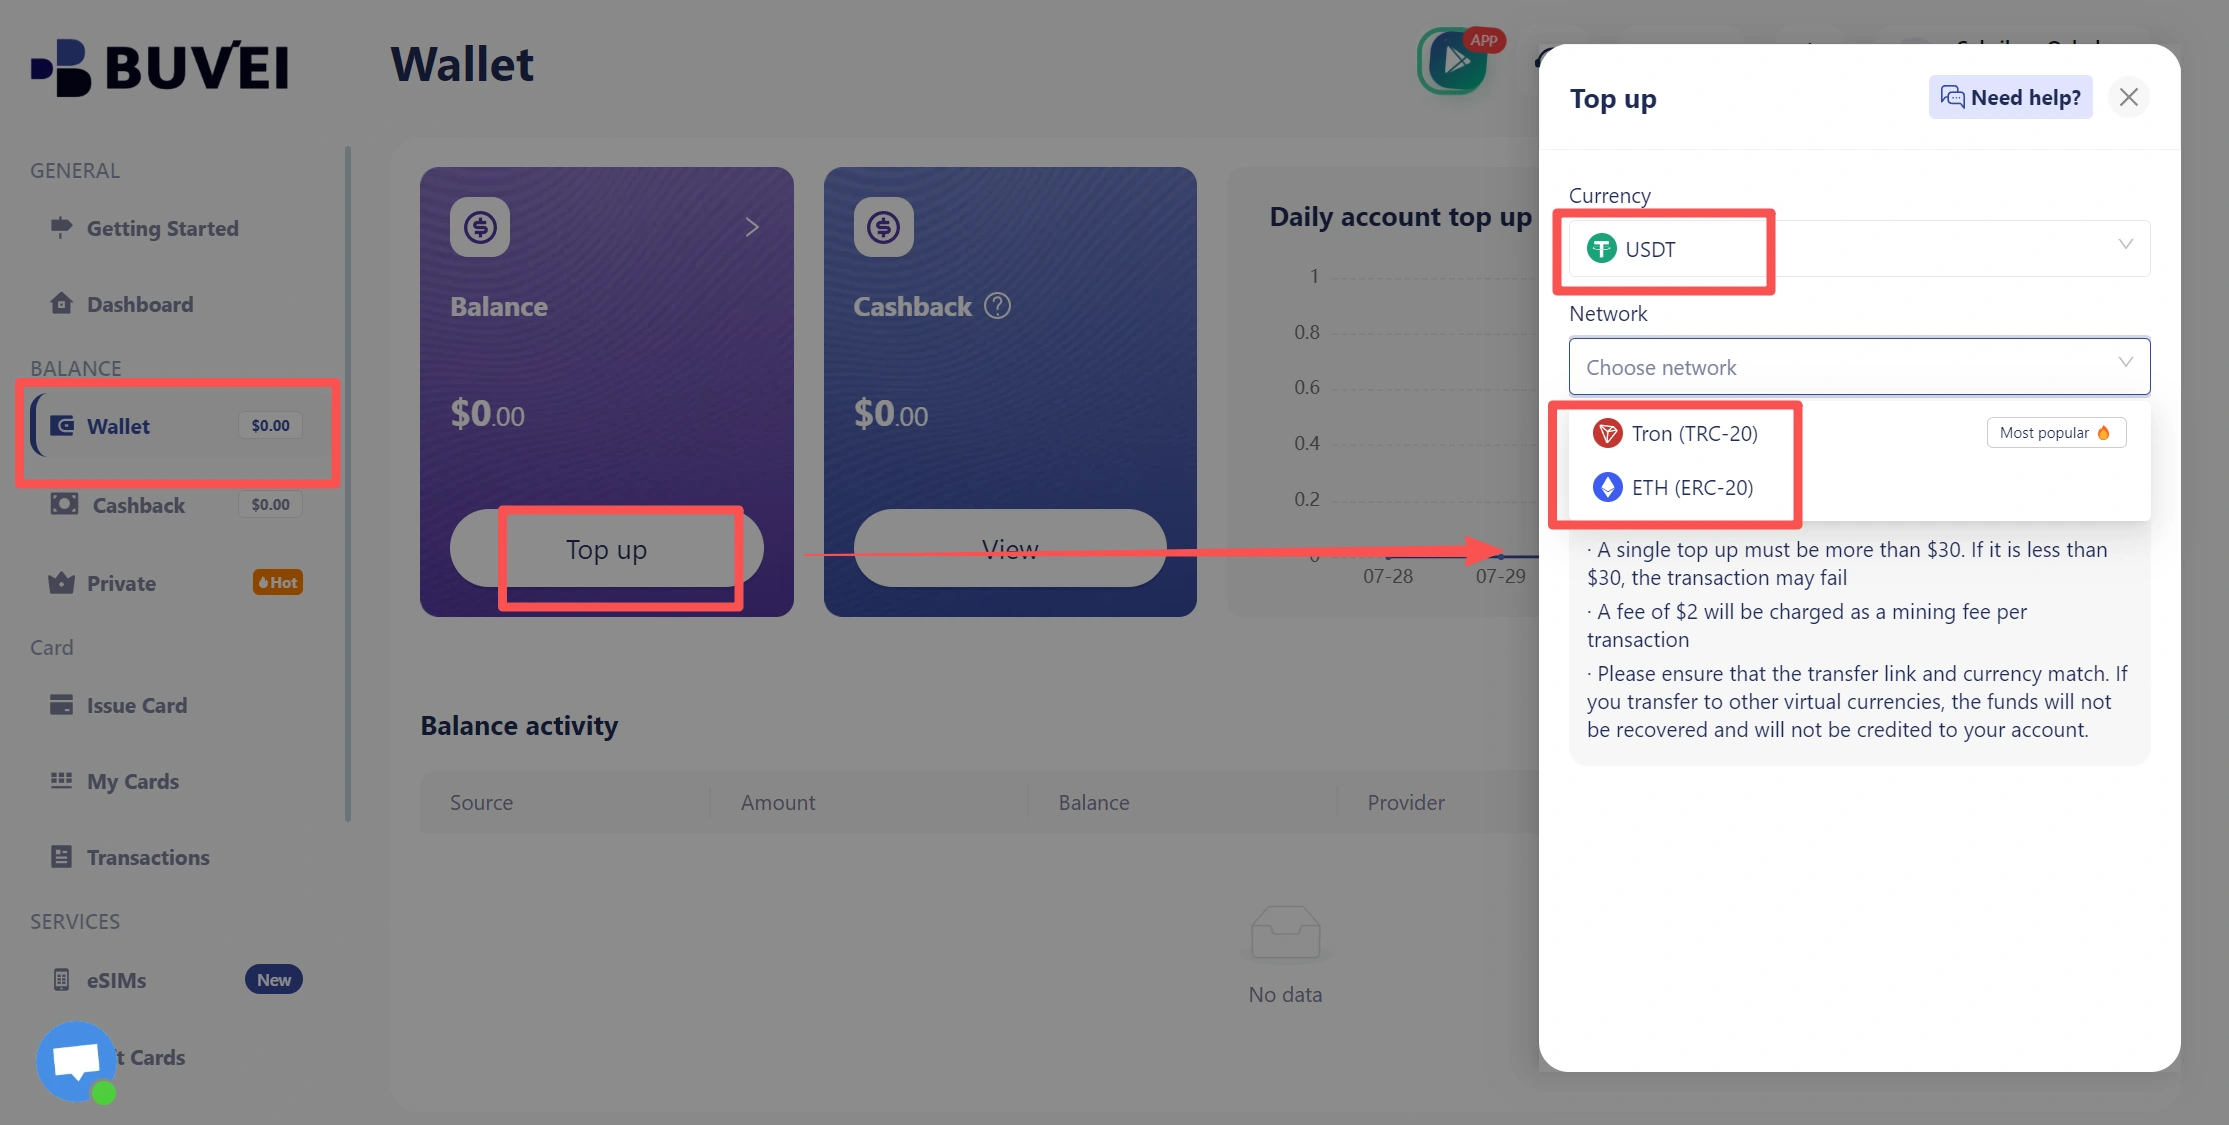
- Navigate to the Wallet tab and top up using supported stablecoins like USDT (TRC20/ERC20). You’ll receive a unique address—copy it and send your funds.
- Once confirmed, your balance will appear in the wallet for immediate use.
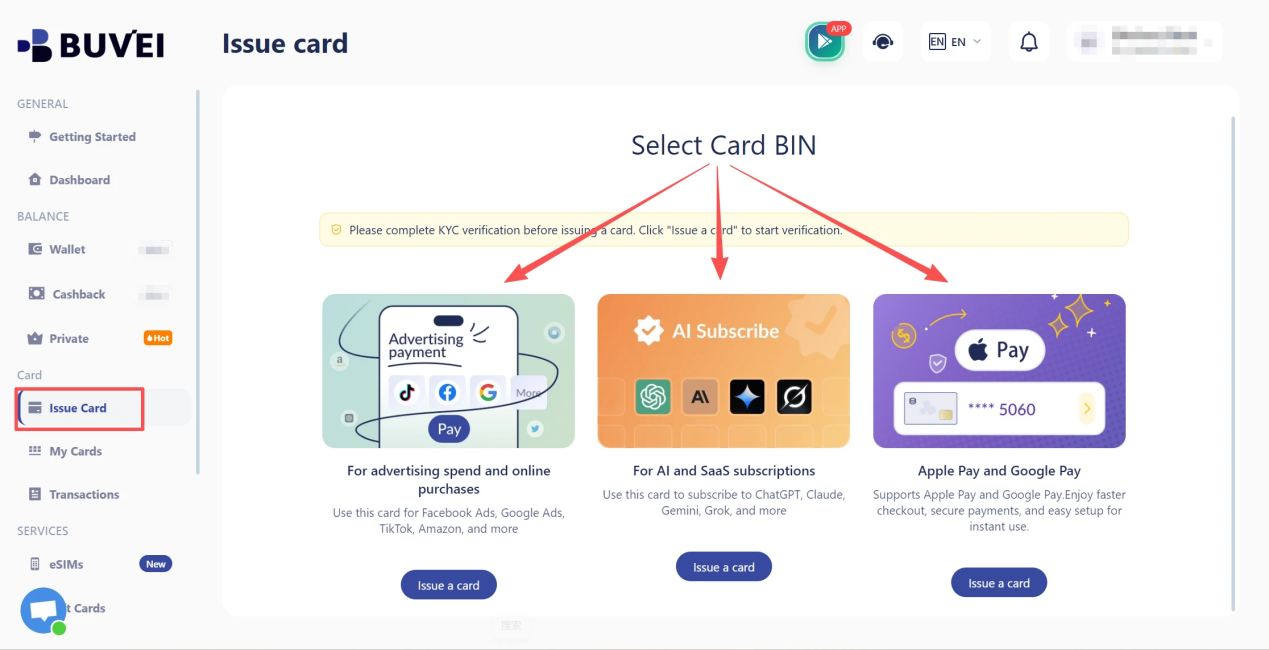
2.Create a Virtual Card
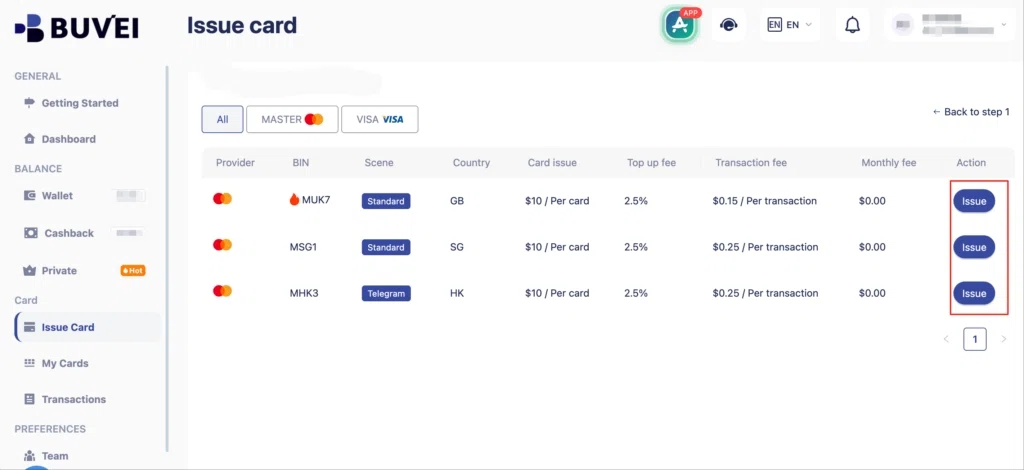
- Go to the Card tab
- Choose your preferred BIN region , (recommends using US BIN)
- Select your card type
- Click Issue
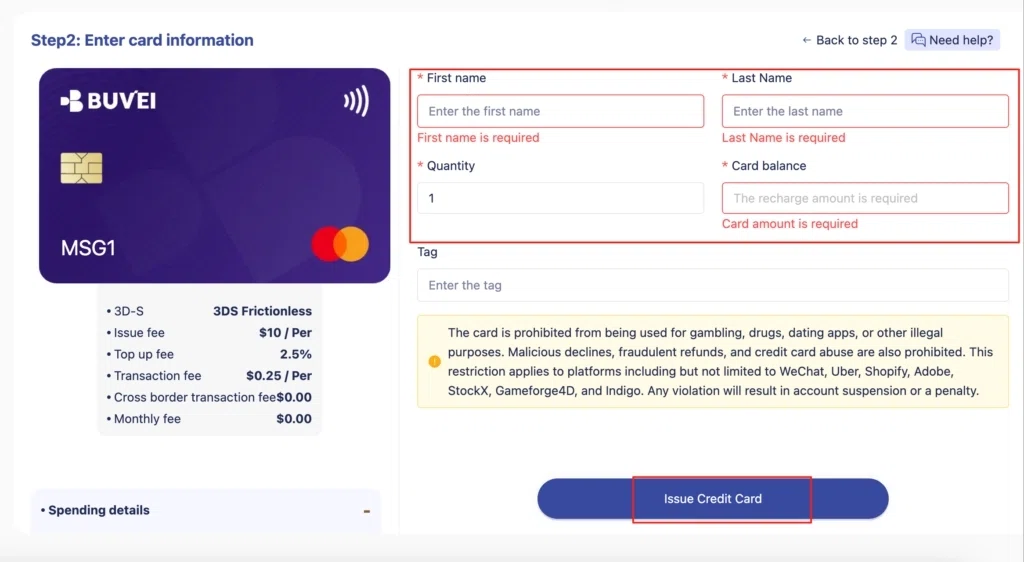
- Fill in the virtual card details, including name, amount, and number of cards.
- Click Issue Card
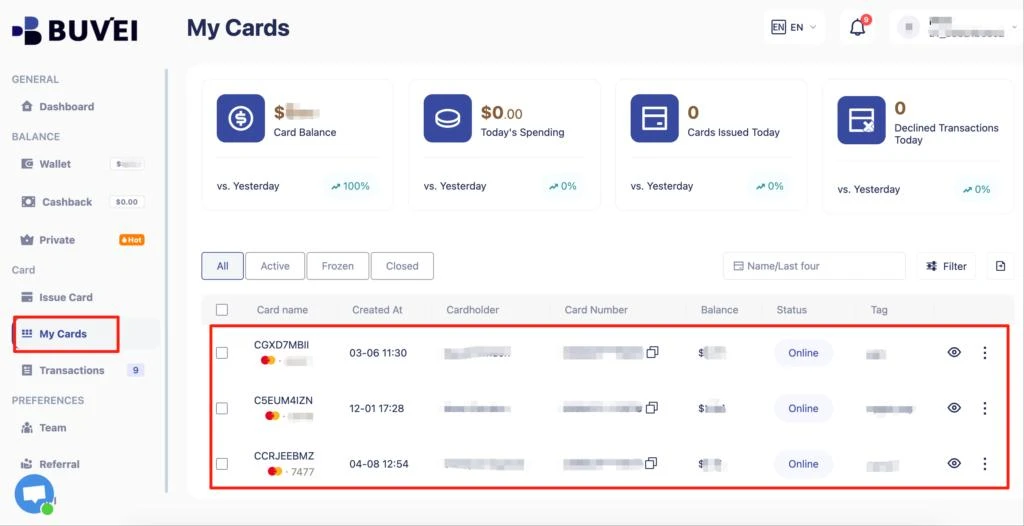
Once created, navigate to My Cards to access your card details:
- Card Number
- Expiration Date
- CVV
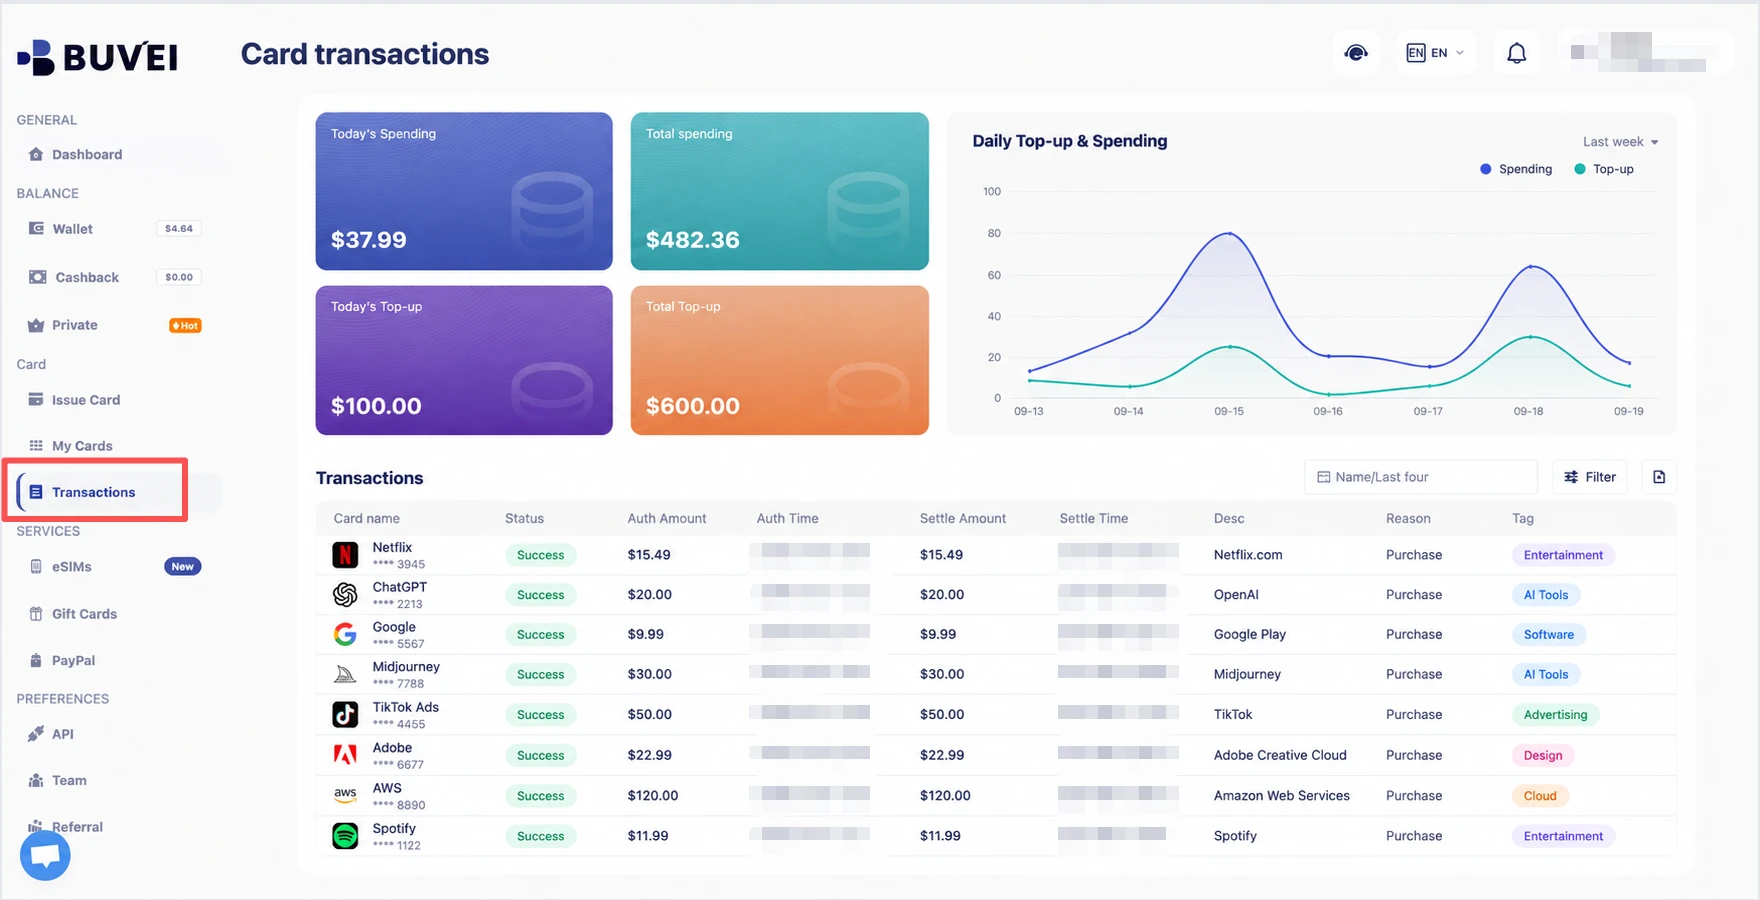
On this page, users can view an overview of their virtual card top-ups and spending, and check all transaction details.
If you use virtual cards for different online services, you can also keep your Krea subscription on a dedicated card. BUVEI supports multiple-card management, making it possible to separate different types of online spending.
Before moving to Krea, make sure the card has enough available balance to cover the subscription charge.
Step 2: Choose a Krea AI Plan
Sign in to your Krea account and open the upgrade or subscription page. Review the plans currently available and select the one you want. Check Krea’s current pricing before subscribing, as plan prices may change over time.
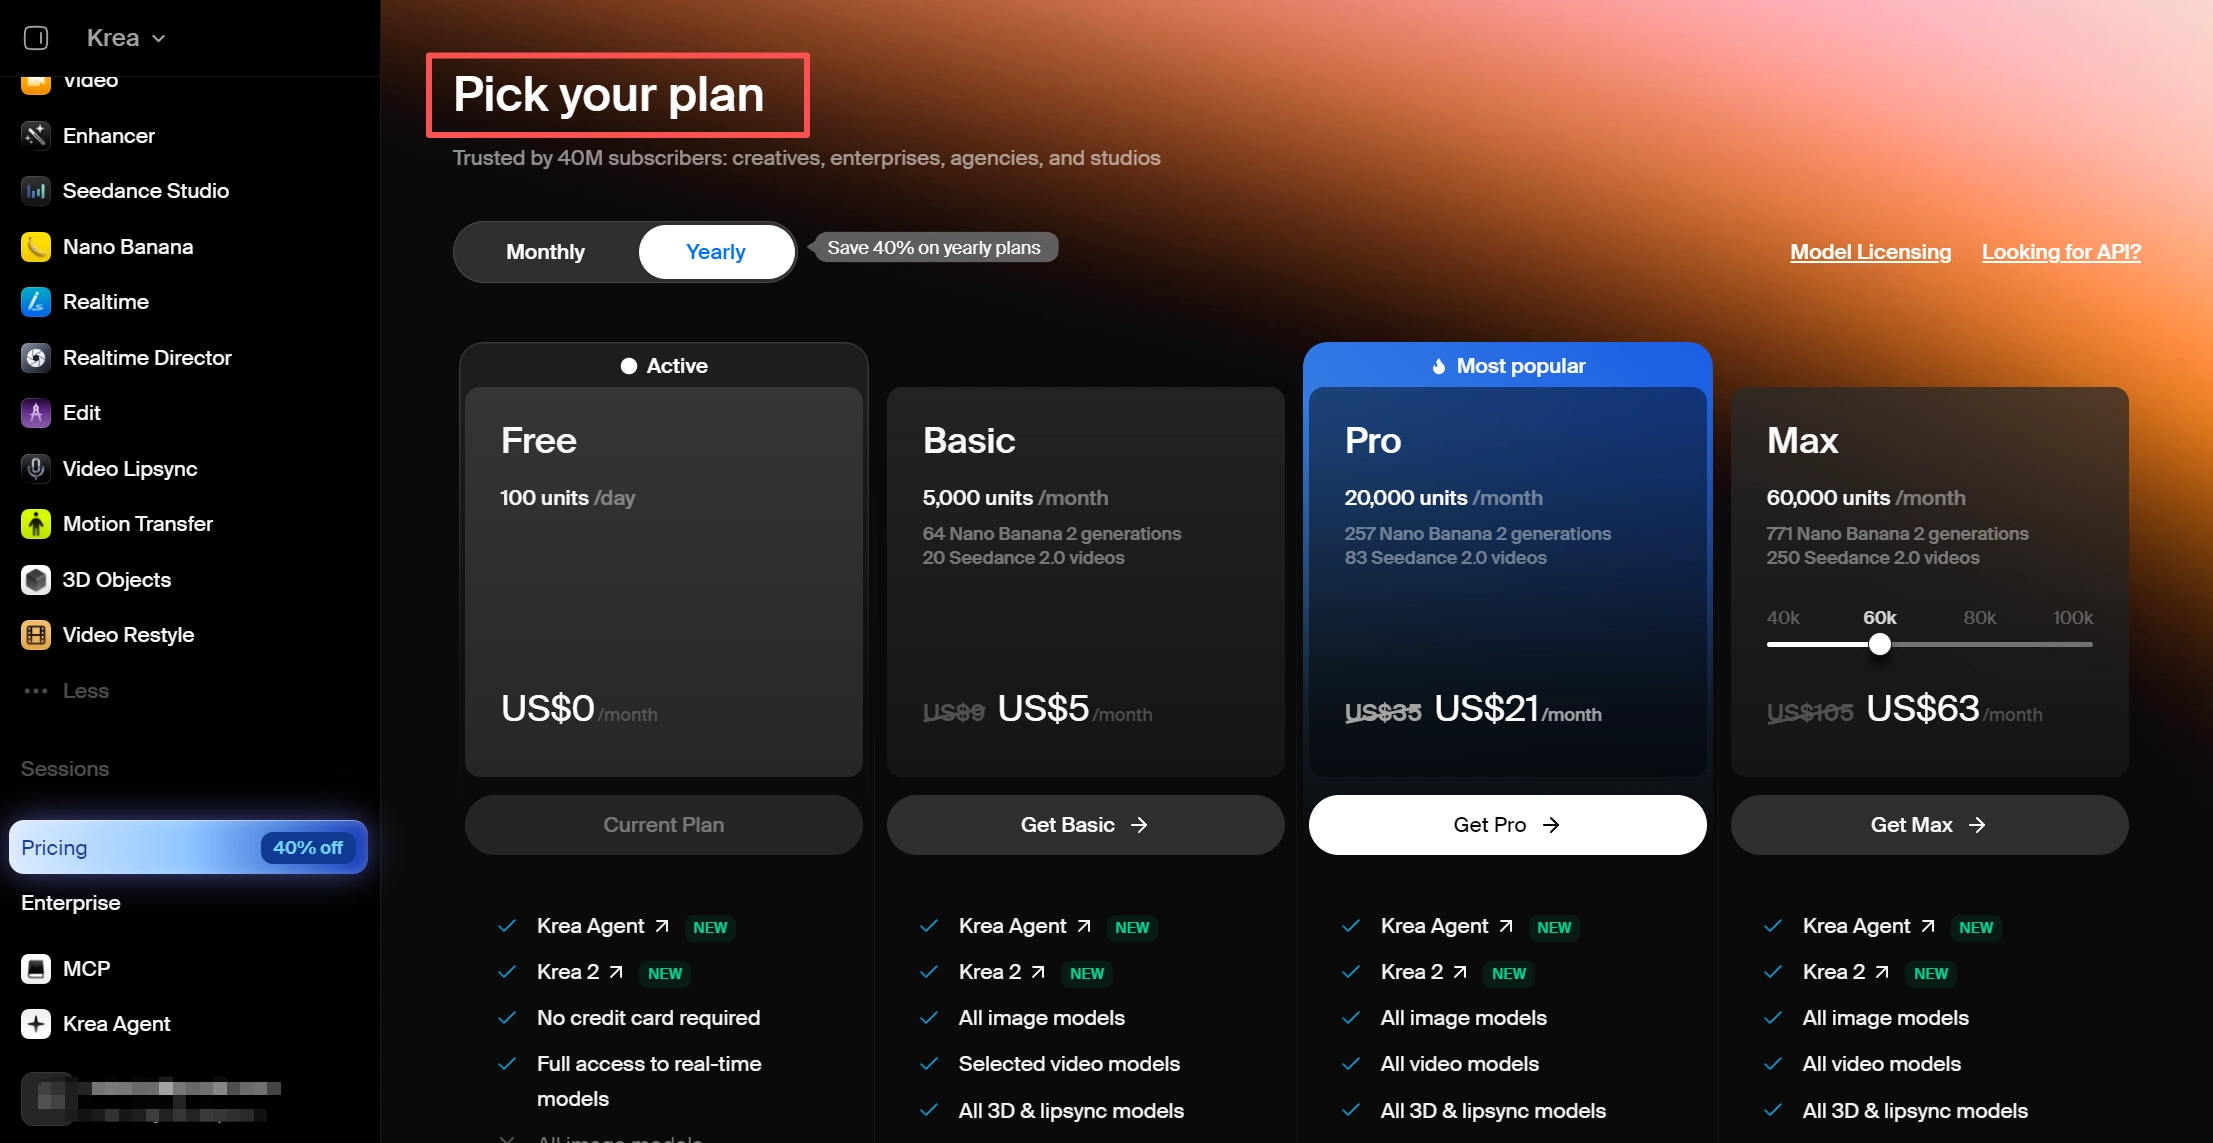
Pay attention to the billing period before continuing. A monthly subscription and an annual subscription can have different charges and renewal schedules. Once you have selected your plan, continue to the payment or checkout page.
Step 3: Enter Your Virtual Card Details
At checkout, enter the information from your virtual card into the payment fields. You will typically need the card number, expiration date, and CVV. If Krea asks for billing information, complete those fields as shown on the checkout page.
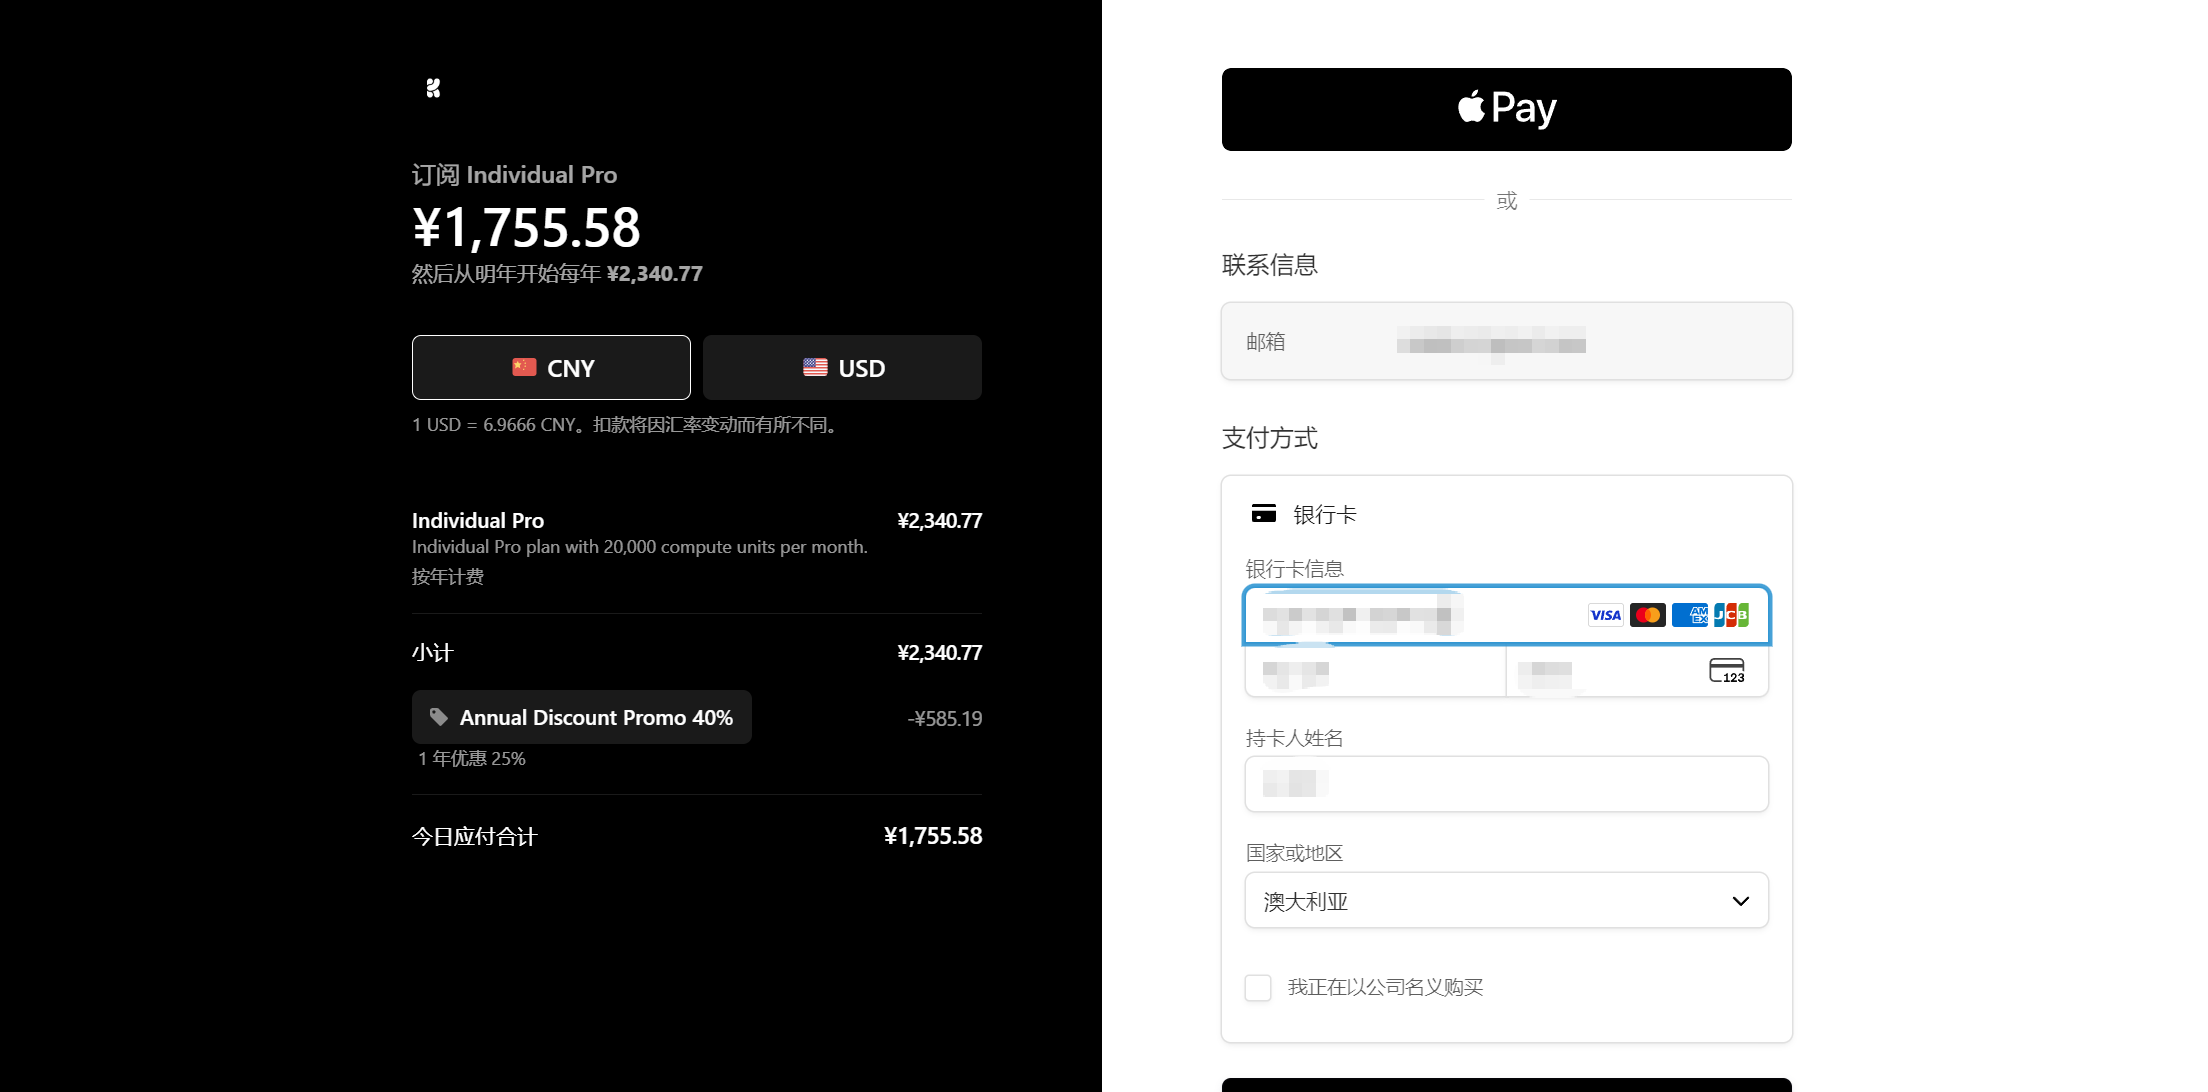
If you are using a BUVEI card, open the card details in the BUVEI app and enter the required information into Krea’s checkout. Check the card number, expiration date, CVV, and billing information carefully before submitting the payment. An incorrect detail can cause the transaction to be declined.
The payment fields shown by Krea’s checkout should be treated as the current requirements for your transaction. Krea uses Stripe for payment processing, so the checkout may also include additional verification depending on the payment.
Step 4: Complete the Payment
Review the subscription amount and billing information before submitting the payment. If the checkout requests additional authentication, complete it before leaving the page. Once the payment is approved, Krea should update your account to the selected paid plan.
Then, you can also check your transaction activity after the payment to confirm the charge.
Your initial payment is now complete. If you selected a recurring subscription, however, the same payment method may be charged again at the next billing period.
After Your Krea AI Payment
After completing the payment, check your Krea account to confirm that the selected subscription is active and that the paid features are available.
It is also useful to keep track of the payment itself. You can also review the transaction record in the BUVEI App to identify the Krea charge later, especially if you use virtual cards for several online subscriptions.
Keeping subscription payments organized can also make it easier to monitor how much you are spending across different AI services.
If Your Krea AI Payment Is Declined
If your Krea AI payment does not go through, start with the basic card and checkout information.
Check that the card number, expiration date, and CVV were entered correctly. Then make sure the card has enough available balance for the charge.
Next, check the billing information requested by Krea. If the checkout requires a billing address or other details, make sure they match the information required by the payment form.
The card itself can also affect the transaction. Some virtual or prepaid cards may have restrictions on recurring payments, merchant categories, regions, or other transaction types.
If the checkout requires additional authentication, complete that step before trying again.
If the payment continues to be declined, check the transaction status with your card provider. If the card appears to be working normally, the issue may need to be investigated through Krea or its payment processor.

Managing Krea AI Subscription Renewals
The first Krea payment is not necessarily the only charge. Krea’s terms describe recurring billing and automatic renewal for applicable paid services.
Before the next renewal, check that the card is still valid and has enough available balance for the upcoming charge. If the card has an expiration date approaching, you may need to update the payment method before the renewal.
If you use BUVEI for AI subscriptions, you can also review previous Krea transactions and monitor the card’s available balance before the next billing date.
A successful first payment does not guarantee that every future renewal will be approved. The card still needs to meet the payment requirements when the recurring transaction is processed.
If you no longer want the subscription, cancel it through your Krea account before the next renewal date rather than relying on a failed payment or insufficient balance.
Frequently Asked Questions
Can I pay for Krea AI with a virtual card?
You can use a virtual card at Krea’s online checkout if the card meets the payment requirements for the transaction. Enter the requested card details and complete any additional verification required by the checkout.
What should I check before using a virtual card for Krea AI?
Check the card’s available balance, expiration date, transaction restrictions, and support for recurring payments if you are signing up for a subscription. You should also have the card number, expiration date, and CVV ready for checkout.
Can I use a prepaid virtual card for Krea AI?
It depends on the specific card and the type of transaction. Some prepaid virtual cards may have restrictions on recurring payments or other transaction types. Check the card’s terms and Krea’s payment requirements before using one for a subscription.
Does Krea AI support recurring payments?
Krea’s terms describe recurring billing and automatic renewal for applicable paid services. If you subscribe to a recurring plan, make sure your payment method remains valid and has sufficient available balance when the next charge is due.
Why was my Krea AI payment declined?
A payment may be declined because of incorrect card details, insufficient balance, billing information, card restrictions, or additional authentication requirements. Check these items first. If everything appears correct, check with your card provider or Krea support to determine where the transaction was declined.
Can I use a BUVEI virtual card for Krea AI?
You can enter a BUVEI virtual card at Krea’s checkout like other supported card payments. However, payment acceptance depends on the specific card, transaction requirements, Krea, and its payment processor. BUVEI does not control Krea’s payment acceptance rules.
Conclusion
Paying for Krea AI with a virtual card only takes a few steps: prepare the card, choose a plan, enter the card details, and complete checkout.
If you use BUVEI, you can create the virtual card before starting the payment and use its card management and transaction monitoring features to keep your Krea subscription organized.
For recurring plans, remember to check the card’s balance, validity, and payment capabilities before the next renewal.